Replacing the system allocator on iOS for fun and profit
A lesser-known optimization
TL;DR
Allocators are a lesser-known, yet very important, part of any app’s performance. By choosing a different allocator for your app, you could potentially improve its performance and memory usage. You can replace your allocator using the methods outlined below.
What is an allocator?
An allocator is a collection of functions for allocating and freeing memory on the heap. On most platforms, including iOS, there will be a default one with a function to allocate memory (malloc) and a function to deallocate memory (free).
Allocation: the hidden performance specter
It may seem like allocating and deallocating memory on the heap is a simple and solved problem, but in fact it is not at all. Facebook reported more than double throughput for web servers when using a different allocator instead the system’s default one. Ruby benchmarks got an 11% speedup by using a different allocator. Instagram web servers got a 10% speedup by just leaking memory instead of freeing it.
Why does it have such a big impact?
CPU Impact
Almost every Objective-C object (and at least some Swift class instances) that you create will require one or more heap allocations, since objects are stored on the heap. This means that an allocator can impact the CPU because of the sheer number of calls made to it and all the bookkeeping that it does. Another impact on performance, which is very subtle but impactful, is from where in the heap it decides to allocate each piece of memory. The details are beyond the scope of this article.
Memory Impact
All allocators require at least a bit of memory overhead, if not a lot, due to fragmentation, bookkeeping, and more.
Different allocators already used on iOS
There are many already being used on iOS. Here, we set a symbolic breakpoint on malloc, which then shows us all the different functions named malloc in libraries used by a simple app:
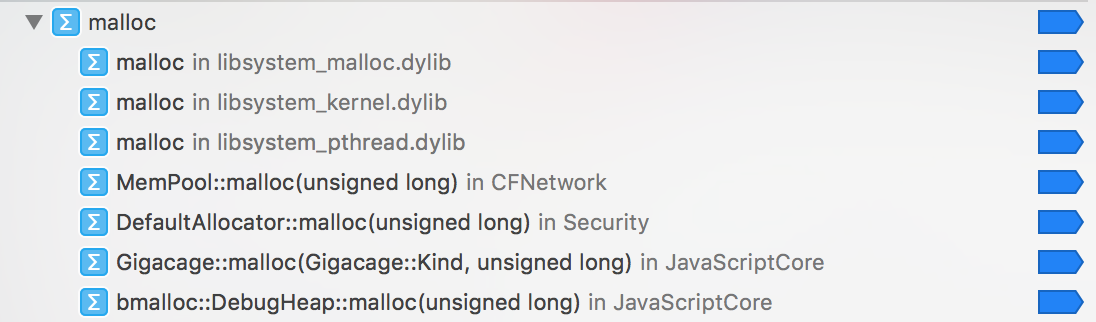
We can see that, for example, the Javascript engine has at least two and CFNetwork has at least one. There are more than that that are just not caught by this breakpoint.
Is it worth it for my app?
To be fair, it’s not the first thing you should do to make your app faster. You should only try it if:
- You’ve solved all the low-hanging performance fruit
- You monitor high-level performance metrics, like app startup time, that you can look at to analyze the effectiveness of a different allocator
- You have good internal testing, so that any issues with stability from this will get caught before they reach production
I thought Apple was pretty good about handling this stuff, so that I don’t have to
There’s no perfect allocator for every case, as you can see by the large number of allocators in the picture above. Good allocators let you tune a variety of tradeoffs, e.g. memory usage vs. CPU usage. Your app has its own unique workload that may benefit from a different allocator.
How do I know what’s the best allocator for my app?
There are lots of allocators, and lots of ways to tune them, but the most popular third-party one right now is jemalloc, which is backed by Facebook and used for large-scale projects like FreeBSD and Mozilla. It’s a good starting point, and is the one that I’ve set up in this post for us to use.
How can I use a different allocator in my app?
The dyld interposing way
This is the original way that I recommended to make the allocator work. However, I’ve decided that the zone approach detailed below is a safer one. If you’re still curious, you can poke around the address sanitizer source code to see an example of dyld interposing for malloc.
The zone way

Since everything goes through malloc, which then calls malloc_zone_malloc, we just have to override one of the two. The most successful, widely-used, and stable library that I’ve seen do this is jemalloc. It works by overriding some of the internals of malloc_zone_malloc, replacing function pointers with jemalloc versions. While it’s meant to work only for OSX, it also works pretty well on iOS, which makes sense because the internals between iOS and OSX are largely the same. Note that building for iOS takes a bit of work with ./configure, for example I used, rougly, ./autogen.sh && ./configure — — with-lg-page=14 — — host=#{triple} — — target=#{triple} where #{triple} would be something like aarch64-apple-ios.
Warning: although there are no obvious issues with it, it’s not proven in production yet. You decide if the risk is worth it. It could also break debug tools that mess with malloc, like Guard Malloc or the Address Sanitizer.
Update: jemalloc is being used in production, with performance benefits, in a large-scale iOS app: https://github.com/jemalloc/jemalloc/issues/1322
The less evil, but less effective, CFAllocator way
CFAllocator is a struct to represent an allocator, e.g. it has function pointers for malloc and free implementations. It is used by Apple for lots of things, e.g. for allocating the buffer that an NSString or NSArray uses. You can set the default one for Apple to use by creating your own CFAllocator and calling CFAllocatorSetDefault with it. Ideally, you should do this early in the app lifecycle to catch more allocations. Although it doesn’t cover all the cases that the previous way does, it is at least officially supported by Apple and thus safer. You can build jemalloc with the repo linked above, and add the –no-replace flag so that it will let you do the replacing yourself.
Measuring results
Microbenchmarks, like testing how long it takes to call malloc or free, are almost useless. Allocation is too complicated to test like that. Instead, look at high-level performance metrics for your app, like startup time.
Conclusion
You now have a few ways of swapping out the default allocator for your own. See if it helps! Swapping out the system allocator is a common practice on other platforms, and it would be nice to see it for iOS. It could be that Apple’s allocator is the best for you, but by using these methods you can explore that for yourself.